Installing SCOM 2019 from the command-line

Ever needed to automate installations of SCOM? In this blog post, we'll go through how to install SCOM 2019 by using only the command line.
Ever since SCOM 2007 R2 there has been the possibility to install SCOM from the command line, it's not a new feature really, but many still don't know about its existence or use it for that matter.
Performing unattended installations or simply installations from the command line can be very useful when wanting to automate processes/installations.
All SCOM features except the Audit Collection Services (ACS) can be installed from the command line, the official documentation for the command line reference can be found over here:
Installing Operations Manager from the Command Prompt
Contents
SCOM installation command line reference
Installing SCOM 2019 from the command-line
Installing the Operations Manager Management server
Installing the Operations Console
Installing the Operations Manager Web Console
Installing the Operations Manager Reporting
SCOM installation command line reference
The command line parameters can be found over here:
Command-line parameters
Installing SCOM 2019 from the command-line
Installing the Operations Manager Management server
Prerequisites:
Command-Line Reference:
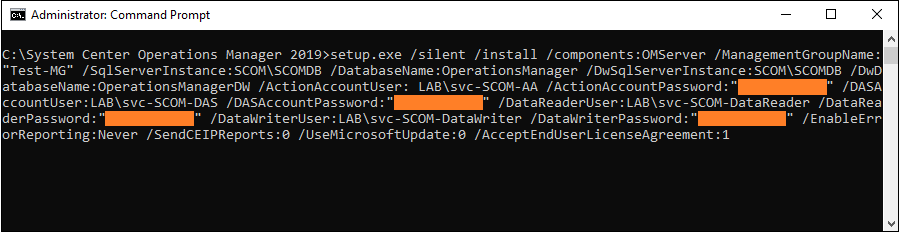
setup.exe /silent /install /components:OMServer
/ManagementGroupName:"<ManagementGroupName>"
/SqlServerInstance:<server\instance or Always On availability group listener>
/SqlInstancePort:<SQL instance port number>
/DatabaseName:<OperationalDatabaseName>
/DwSqlServerInstance:<server\instance or Always On availability group listener>
/DwSqlInstancePort:<SQL instance port number>
/DwDatabaseName:<DWDatabaseName>
/UserLocalSystemActionAccount
/UseLocalSystemDASAccount
/DataReaderUser:<domain\username>
/DataReaderPassword:<password>
/DataWriterUser:<domain\username>
/DataWriterPassword:<password>
/EnableErrorReporting:[Never|Queued|Always]
/SendCEIPReports:[0|1]
/UseMicrosoftUpdate:[0|1]
/AcceptEndUserLicenseAgreement:1
Note: The above command assumes that you specified the Local System for the Management server action account (/UseLocalSystemActionAccount) and Data Access service (/UseLocalSystemDASAccount).
To specify a domain\user name for these accounts, you must provide the following parameters instead:
/ActionAccountUser:<domain\username> /ActionAccountPassword:<password>
/DASAccountUser:<domain\username> /DASAccountPassword:<password>
(Make sure that everything is on one line when you run the full command!)
Note: In the guide below, we will be using the ActionAccountUser and the DASAccountUser.
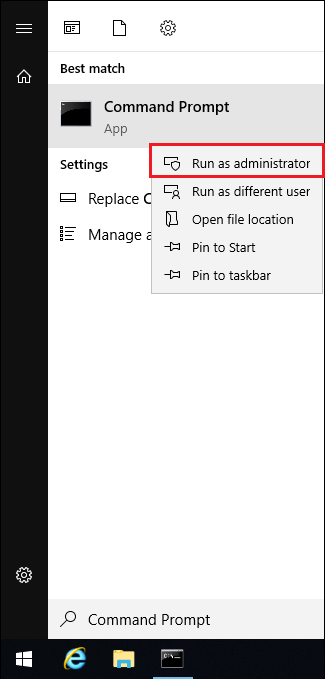
1. Open up a Command Prompt (Admin).
SCOM2019_CMD_Console_2
2. By default the Operations Manager Management Server will be installed in "C:\Program Files\...":
If we want to install the Operations Console to another location, add the /installpath parameter:
setup.exe /silent /install /installpath:"D:\Program Files" /components:OMServer
3. Specify a management group name as follows:
/ManagementGroupName:"Management Group Name"
4. Provide the SQL Server instance for the SCOM database:
/SqlServerInstance:"server\instance" or "Always On availability group listener"
5. Provide the port of the SQL Server instance used by SCOM:
/SqlInstancePort:"SQL instance port number"
(If you use the default port, there's no need to specify the /SQLInstancePort parameter)
6. Provide a database name for the Operational Database:
/DatabaseName:"OperationalDatabaseName"
7. Provide the SQL Server instance for the SCOM data warehouse:
/DwSqlServerInstance:"server\instance " or "Always On availability group listener"
8. Provide a database name for the Operational Data Warehouse:
/DwDatabaseName:"DWDatabaseName"
9. Provide a domain account and password for the Management server action service:
/ActionAccountUser: "domain\username"
/ActionAccountPassword:"password"
10. Provide a domain account and password for the System Center Configuration service and System Center Data Access service:
/DASAccountUser:"domain\username"
/DASAccountPassword:"password"
11. Provide a domain account and password for the Data Reader User:
/DataReaderUser:"domain\username"
/DataReaderPassword:"password"
12. Provide a domain account and password for the Data Writer User:
/DataWriterUser:"domain\username"
/DataWriterPassword:"password"
13. We will now need to add whether we want to enable error reporting or not, select one of the following values:
/EnableErrorReporting: Never
(Do not opt in to sending automatic error reports)
/EnableErrorReporting: Queued
(Opt in to sending error reports, but queue the reports for review before sending)
/EnableErrorReporting: Always
(Opt in to automatically send error reports)
14. Next we will need to select whether we want to opt in the Customer Experience Improvement Program (CEIP) or not, select one of the following values:
/SendCEIPReports: 0
(Do not opt in)
/SendCEIPReports: 1
(Opt in)
15. Now we'll need to choose if we want to opt in Microsoft updates or not, select one of the following values:
/UseMicrosoftUpdate: 0
(Do not opt in)
/UseMicrosoftUpdate: 1
(Opt in)
16. Finally we need to agree to the end user licensing terms:
/AcceptEndUserLicenseAgreement: 1
17. Now run the command from the administrative Command Prompt:
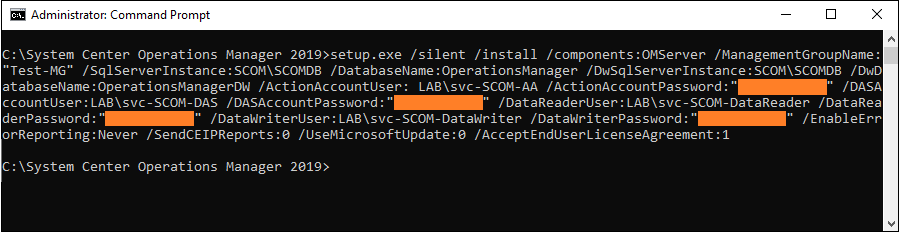
18. After a few minutes the Operations Manager Management Server should be installed.
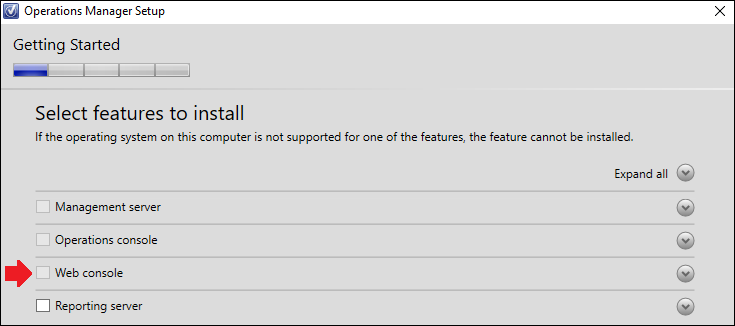
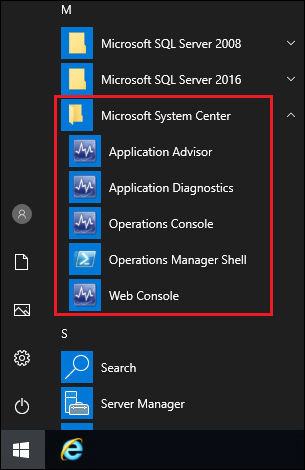
19. Let's finally verify that the Operations Manager Management Server feature has been installed:

(A grey box means the feature is installed)
Note: The installation status can also be checked in the SCOM installation log:
OpsMgrSetupWizard.log which is found at: %LocalAppData%\SCOM\LOGS
If the installation completed successfully, the end of the OpsMgrSetupWizard log should show a similar result to this:

Installing the Operations Console
Prerequisites:
Command-Line Reference:
setup.exe /silent /install /components:OMConsole/EnableErrorReporting:[Never|Queued|Always]/SendCEIPReports:[0|1]/UseMicrosoftUpdate:[0|1]/AcceptEndUserLicenseAgreement:1
SCOM2019_CMD_Console_2
(Make sure that everything is one one line when you run the full command!)1. Open up a Command Prompt (Admin).2. By default the Operations Console will be installed in "C:\Program Files\...":If we want to install the Operations Console to another location, add the /installpath parameter:
setup.exe /silent /install
/installpath
:"D:\Program Files" /components:OMConsole
3. We will now need to add whether we want to enable error reporting or not, select one of the following values:
/EnableErrorReporting:
Never
(Do not opt in to sending automatic error reports)
/EnableErrorReporting:
Queued
(Opt in to sending error reports, but queue the reports for review before sending)
/EnableErrorReporting:
Always
(Opt in to automatically send error reports)4. Next we will need to select whether we want to opt in the Customer Experience Improvement Program (CEIP) or not, select one of the following values:
/SendCEIPReports:
0
(Do not opt in)
/SendCEIPReports:
1
(Opt in)5. Now we'll need to choose if we want to opt in Microsoft updates or not, select one of the following values:
/UseMicrosoftUpdate:
0
(Do not opt in)
/UseMicrosoftUpdate:
1
(Opt in)6. Finally we need to agree to the end user licensing terms:
/AcceptEndUserLicenseAgreement:
1

SCOM2019_CMD_Console_4.png

SCOM2019_CMD_Console_6.1.png
7. Before running the command let's check which SCOM features we have installed:(A white check box means the feature is not installed)8. Now run the command from the administrative Command Prompt:
setup.exe /silent /install /components:OMConsole /EnableErrorReporting:Never /SendCEIPReports:0 /UseMicrosoftUpdate:0 /AcceptEndUserLicenseAgreement:1

SCOM2019_CMD_Console_5.11.png

SCOM2019_CMD_Console_4.2

SCOM2019_CMD_Console_3.1
SCOM2019_CMD
9. After a few minutes the Operations Console feature should be installed.10. Let's finally verify that the SCOM Operations Console has been installed:(A gray check box means the feature is installed)Note: The installation status can also be checked in the SCOM installation log: OpsMgrSetupWizard.log which is found at: %LocalAppData%\SCOM\LOGSIf the installation completed successfully, the end of the OpsMgrSetupWizard log should show a similar result to this:
Installing the Operations Manager Web Console
Prerequisites:
Internet Explorer version 11.
Microsoft Edge version 40 and later.
Google Chrome version 67 and later.
Internet Information Services: IIS 7.5 and later versions with the IIS Management.
Console and the following role services installed:
Static Content.
Default Document.
Directory Browsing.
HTTP Errors.
HTTP Logging.
Request Monitor.
Request Filtering.
Static Content Compression.
Web Server (IIS) Support.
IIS 6 Metabase Compatibility.
ASP.NET (both the 3.5 and 4.5 or higher versions of ASP.NET are required.)
Windows Authentication.
Selected website for web console: Requires a configured http or https binding.
.NET Framework 4 or .NET Framework 4.5 is required.
Command-Line Reference:
setup.exe /silent /install /components:OMWebConsole/ManagementServer:/WebSiteName:"" [/WebConsoleUseSSL]/WebConsoleAuthorizationMode:[Mixed|Network]/SendCEIPReports:[0|1]/UseMicrosoftUpdate:[0|1]/AcceptEndUserLicenseAgreement:1
SCOM2019_CMD_Console_2
(Make sure that everything is one one line when you run the full command!)1. Open up a Command Prompt (Admin).2. By default the Operations Manager Web Console will be installed in "C:\Program Files\...":If we want to install the Operations Manager Web Console to another location, add the /installpath parameter:
setup.exe /silent /install
/installpath
:"D:\Program Files" /components:OMWebConsole
3. Select whether to opt in for error reporting or not, select one of the following values:
/EnableErrorReporting:
Never
(Do not opt in to sending automatic error reports)
/EnableErrorReporting:
Queued
(Opt in to sending error reports, but queue the reports for review before sending)
/EnableErrorReporting:
Always
(Opt in to automatically send error reports)4. Select whether to opt in the Customer Experience Improvement Program (CEIP) or not, select one of the following values:
/SendCEIPReports:
0
(Do not opt in)
/SendCEIPReports:
1
(Opt in)5. Select whether to opt in Microsoft updates or not, select one of the following values:
/UseMicrosoftUpdate:
0
(Do not opt in)
/UseMicrosoftUpdate:
1
(Opt in)6. Finally select to agree to the end user licensing terms:
/AcceptEndUserLicenseAgreement:
1

SCOM2019_CMD_WebConsole_4

SCOM2019_CMD_WebConsole_1.1.png
7. Before running the command let's check which SCOM features we have installed:(A grayed out check box means that the feature is installed, the white check box means the feature is not installed)8. Now run the command from the administrative Command Prompt:
setup.exe /silent /install /components:OMWebConsole /ManagementServer:SCOM.lab.ad /WebSiteName:"Default Web Site" /WebConsoleAuthorizationMode:Mixed /SendCEIPReports:0 /UseMicrosoftUpdate:0 /AcceptEndUserLicenseAgreement:1

SCOM2019_CMD_WebConsole_5
SCOM2019_CMD_WebConsole_6
SCOM2019_CMD_WebConsole_3
SCOM2019_CMD
9. After a few minutes the SCOM Web Console feature should be installed.10. Let's finally verify that the SCOM Web Console has been installed:Note: The installation status can also be checked in the SCOM installation log: OpsMgrSetupWizard.log which is found at: %LocalAppData%\SCOM\LOGSIf the installation completed successfully, the end of the OpsMgrSetupWizard log should show a similar result to this:
Installing the Operations Manager Reporting
Prerequisites:
SCOM Management Server
Command-Line Reference:
setup.exe /silent /install /components:OMReporting/ManagementServer:/SRSInstance:<server\instance>/DataReaderUser:<domain\username>/DataReaderPassword:/SendODRReports:[0|1]/UseMicrosoftUpdate:[0|1]/AcceptEndUserLicenseAgreement:1
SCOM2019_CMD_Console_2
(Make sure that everything is one one line when you run the full command!)Note: The /ManagementServer parameter is only required when you are installing reporting on a server that is not a management server.1. Open up a Command Prompt (Admin).2. By default the SCOM Reporting will be installed in "C:\Program Files\...":If we want to install the SCOM Reporting to another location, add the /installpath parameter:
setup.exe /silent /install
/installpath
:"D:\Program Files" /components:OMReporting
3. Next we need to enter the server name and the instance name of the SQL Reporting Services>
/SRSInstance:
<server\instance>
4. Now we'll need to provide the credentials for the domain user that is used for the data reader account for the Reporting Services.
/DataReaderUser:
<domain\username>
/DataReaderPassword:
<password>
5. Select whether we want to send diagnostics and usage data or not, select one of the following values:
/SendODRReports:
0
(Do not send data to Microsoft)
/SendODRReports:
1
(Send data to Microsoft)6. Select whether to opt in Microsoft updates or not, select one of the following values:
/UseMicrosoftUpdate:
0
(Do not opt in)
/UseMicrosoftUpdate:
1
(Opt in)7. Finally select to agree to the end user licensing terms:
/AcceptEndUserLicenseAgreement:
1
SCOM2019_CMD_Reporting_4

SCOM2019_CMD_Reporting_2
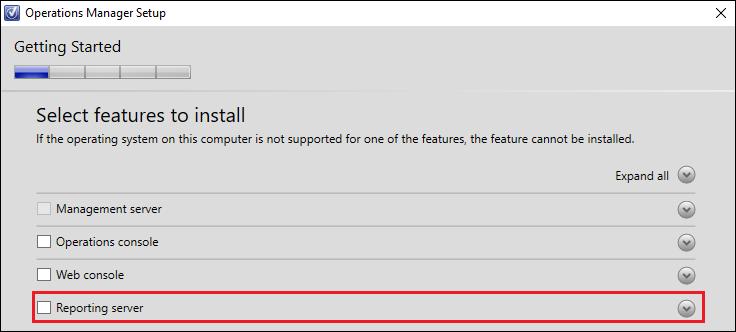
8. Before running the command let's check which SCOM features we have installed:(A grayed out check box means that the feature is installed, the white check box means the feature is not installed)9. Now run the command from the administrative Command Prompt:
setup.exe /silent /install /components:OMReporting /ManagementServer:SCOM.lab.ad /SRSInstance:SCOM\SCOMDB /DataReaderUser:LAB\svc-SCOM-DataReader /DataReaderPassword:"*********" /SendODRReports:0 /UseMicrosoftUpdate:0 /AcceptEndUserLicenseAgreement:1

SCOM2019_CMD_Reporting_3

SCOM2019_CMD_Reporting_5
SCOM2019_CMD
10. After a few minutes the SCOM Reporting feature should be installed.11. Let's finally verify that the SCOM Web Console has been installed:Note: The installation status can also be checked in the SCOM installation log: OpsMgrSetupWizard.log which is found at: %LocalAppData%\SCOM\LOGSIf the installation completed successfully, the end of the OpsMgrSetupWizard log should show a similar result to this: